Quick start: use your own design reference
Use an existing DESIGN.md, or generate one from a public webpage and bring it into your current project. A design reference complements your feature requirements and visual checks.
v0: attach the reference
In your v0 chat, attach DESIGN.md and the relevant UI files, or paste the needed design rules. Ask which material was read, then describe your page. Inspect the generated preview and use the exported project’s own build instructions if you export it.
Read DESIGN.md and inspect the existing UI before editing. Add a settings page using the documented design rules. Explain any missing design decisions. Build and check the page on desktop and mobile.Lovable: add project Knowledge
Open your project settings and add the relevant design rules to Knowledge. State where the complete reference is kept and ask Lovable to confirm the available context. Check the actual preview after each change; source export is a separate workflow.
Read DESIGN.md and inspect the existing UI before editing. Add a settings page using the documented design rules. Explain any missing design decisions. Build and check the page on desktop and mobile.v0: Shiftline
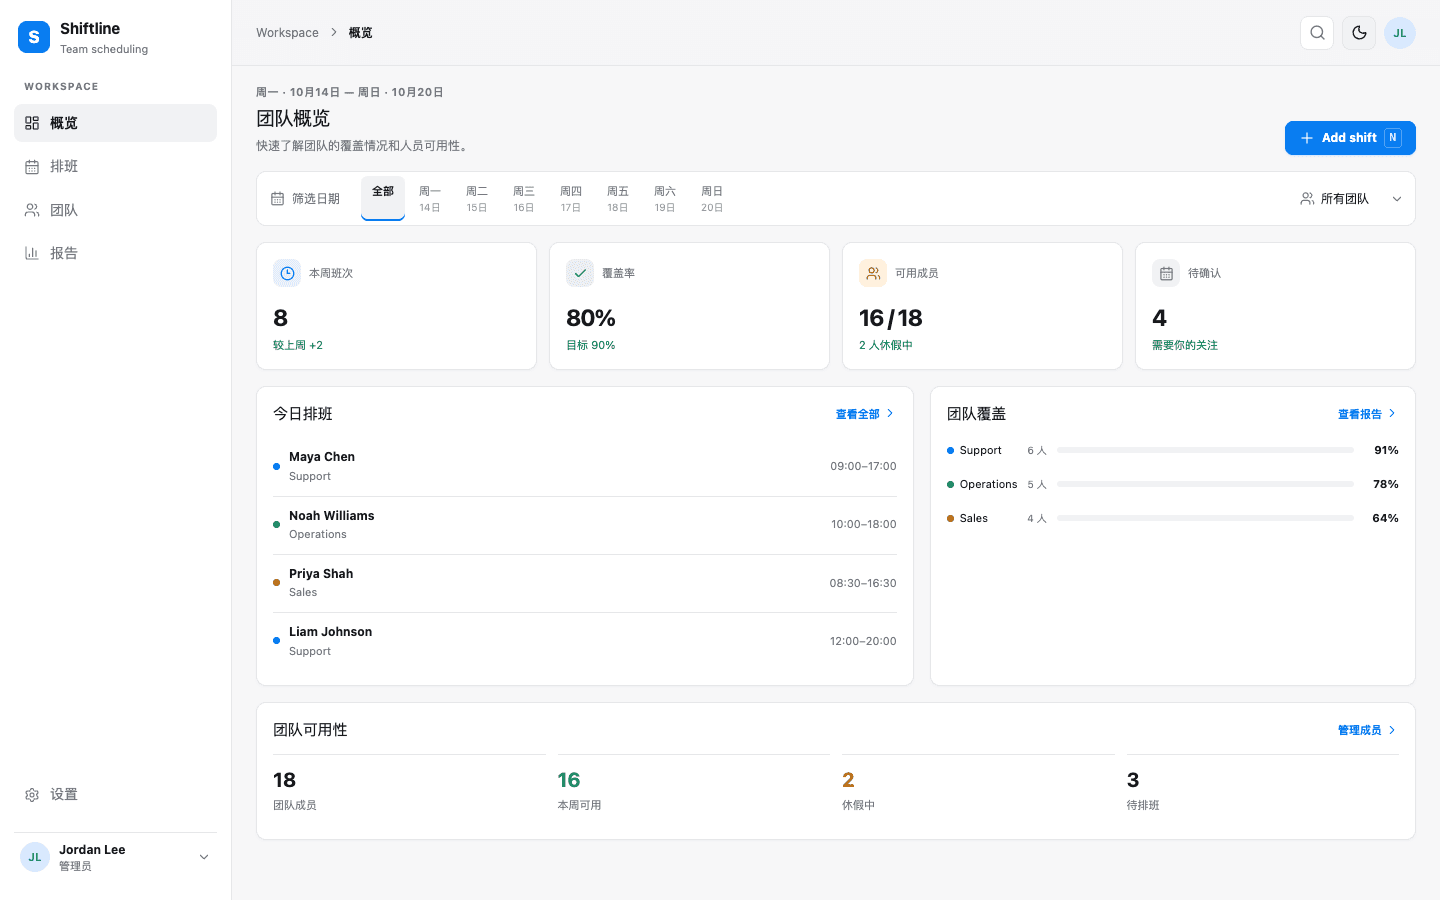
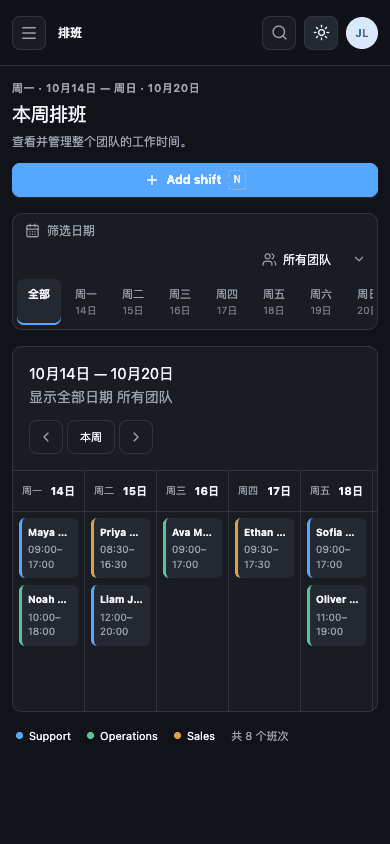
v0 used the Atlas reference to build a Chinese-language Shiftline dashboard and a separate Schedule page. You can add shifts, combine day and team filters, and keep changes in this browser after a reload. On a phone, scroll the weekly grid sideways to reach the weekend.
v0 Mini · Next.js 16.3.3 ·
Optional worked example: dashboard to scheduling app
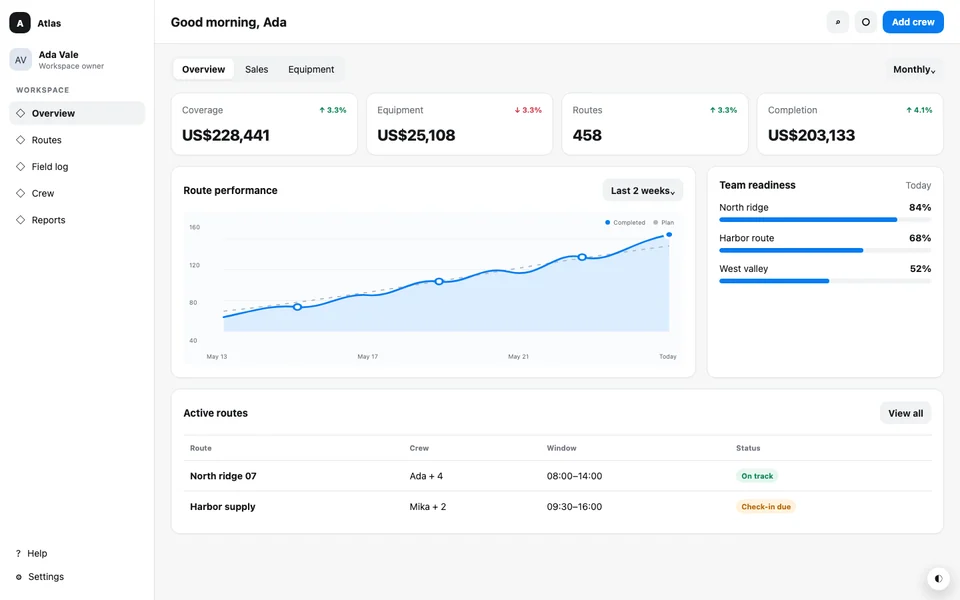
A dense dispatch dashboard with status cards, an operational table, restrained color roles, and compact responsive navigation.
Steps
Start with one working download
Open Atlas Dispatch in Gallery and compare its source, clone, and DESIGN.md. Create your own clone of that public source, download the starter project, and extract it into a new folder. Use Node.js 24 to install and preview the unmodified files before asking the tool to make changes.
Save the reference and note what each tool receives
Copy the captured DESIGN.md to REFERENCE_DESIGN.md before editing and keep it unchanged. For each tool, note the files or excerpts you supplied. Keep any new DESIGN.md separate from the original reference and check it against the finished pages if you plan to use it.
v0: attach the design reference
Start a separate v0 project. Use the chat attachment control to add REFERENCE_DESIGN.md and the source files relevant to the page, then paste the same scheduling brief. Inspect what v0 received before generating. A text file describes visual rules; it does not import a running backend.
Lovable: add project Knowledge
Start a separate Lovable project and open Project settings → Knowledge. Add the relevant captured design rules and reference-file instruction, then send the same scheduling brief. Lovable can also read AGENTS.md or CLAUDE.md from a connected project repository. Verify the files available in this project instead of assuming a ZIP upload imports them.
With source: build each project independently
For v0, obtain the source through its export or repository options. If you also obtain Lovable source, check that project separately. Keep each output in its own folder with REFERENCE_DESIGN.md, then follow the project instructions to install and build. Open the rebuilt pages and compare them with the reference. Check any final DESIGN.md against those pages before using it as the new style guide.
Without export: check the Lovable preview
You can review and share the working Lovable preview without exporting its source. Open it on desktop and phone, then save screenshots or a screen recording of the pages and actions you checked. Keep the preview link, review date, and the files or excerpts supplied from REFERENCE_DESIGN.md with those images. When sharing the result, describe the preview you tested and say that you have not independently rebuilt the source or checked a final DESIGN.md.
Try the same actions in both results
Check v0 and Lovable separately at 390px, 768px, and 1440px. Use the navigation to open the dashboard and Schedule page. Change the day and team filters, add a shift, then reload and confirm it was saved. Use the keyboard to open and close controls, check for horizontal page overflow, and try any working theme switch after reload.
Files and commands
Project Knowledge instruction
Use the supplied REFERENCE_DESIGN.md facts for typography, color roles, spacing, and responsive layout. Keep the reference unchanged. Tell me which reference files or excerpts are available before editing, then build Shiftline from the brief. If you create a new DESIGN.md, keep it separate and describe the finished site.The same scheduling brief
Build Shiftline, a weekly scheduling dashboard for teams of 8 to 20 people. Rebrand Atlas Dispatch with team availability and coverage summaries. Add a separate Schedule page linked from the navigation with a weekly shift view. Let people add a shift locally, filter by day and team, and keep the new shift after reload. Keep the captured layout density, typography, spacing, table behavior, and any working themes. Do not add a backend or copy claims from the source. Preserve the captured DESIGN.md as REFERENCE_DESIGN.md. Check both pages and keyboard operation at 390px, 768px, and 1440px, including horizontal overflow and theme behavior after reload. With source access, install and build the project independently. Without source export, test the actual preview and save screenshots or a recording of the actions. If a final DESIGN.md is available, check it against the finished pages and report that check separately.Run the CloneAny starter before using either tool
npm ci
npm run build
npm run preview
If a builder cannot read a file
Ask which files the project can read. If it cannot read an attachment, paste the relevant design facts into the project context and note exactly what you supplied. Keep the complete REFERENCE_DESIGN.md with your project notes so you can compare either result with it.
For exported source, follow the install and build instructions included with the project; the original Tailwind commands may no longer apply. For a Lovable preview, record the page and action that failed, ask for a fix, and repeat that action in the updated preview. Keep v0 and Lovable checks separate.
Official tool documentation
Bring the reference into your project
Start with a public webpage, get its frontend project and design guide, then continue with your own requirements.
Generate a design reference